
| |
Structure |
Structure
The robot is made up of two main parts: a manipulator and a controller.
The IRB 1400
manipulator has 6 axes.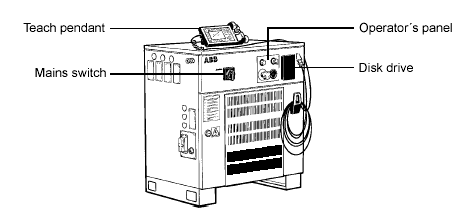
The controller is specifically designed to control robots, which means that optimal performance and functionality is achieved.
The controller contains the electronics required to control the manipulator, external axes and peripheral equipment.
Safety/Standards
The robot complies fully with the health and safety standards specified in the EECĺs Machinery Directives as well as ANSI/RIA 15.06-1992.The robot is designed with absolute safety in mind. It has a dedicated safety system based on a two-channel circuit which is monitored continuously. If any component fails, the electrical power supplied to the motors shuts off and the brakes engage.
Safety category 3
Malfunction of a single component, such as a sticking relay, will be detected at the next MOTOR OFF/MOTOR ON operation. MOTOR ON is then prevented and the faulty section is indicated. This complies with category 3 of EN 954-1, Safety of machinery -safety related parts of control systems - Part 1.
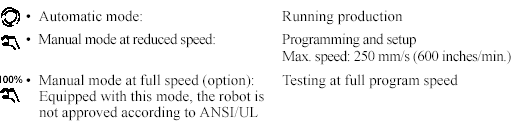
Selecting the operating mode
The robot can be operated either manually or automatically. In manual mode, the robot can only be operated via the teach pendant, i.e. not by any external equipment.
Reduced speed
In manual mode, the speed is limited to a maximum of 250 mm/s (600 inches/min.). A speed limitation applies not only to the TCP (Tool Centre Point), but to all parts of the robot. It is also possible to monitor the speed of equipment mounted on the robot.
Three position enabling device
The enabling device on the teach pendant must be used to move the robot when in manual mode. The enabling device consists of a switch with three positions, meaning that all robot movements stop when either the enabling device is pushed fully in, or when it is released completely. This makes the robot safer to operate.
Safe manual movement
The robot is moved using a joystick instead of the operator having to look at the teach pendant to find the right key.
Over-speed protection
The speed of the robot is monitored by two independent computers.
Emergency stop
There is one emergency stop push button on the controller and another on the teach pendant. Additional emergency stop buttons can be connected to the robotĺs safety chain circuit.
Safeguarded space stop
The robot has a number of electrical inputs which can be used to connect external safety equipment, such as safety gates and light curtains. This allows the robotĺs safety functions to be activated both by peripheral equipment and by the robot itself.
Delayed safeguarded space stop
A delayed stop gives a smooth stop. The robot stops in the same way as at normal program stop with no deviation from the programmed path. After approx. one second the power supplied to the motors shuts off.
Restricting the working space
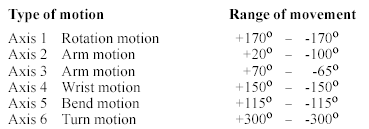
The movement of each of the axes can be restricted using software limits. Axes 1 and
2 can also be restricted by means of an adjustable mechanical stop. Axis 3 can be
restricted using an electrical limit switch.
Hold-to-run control
"Hold-to-run" means that you must depress the start button in order to move the robot. When the key is released the robot will stop. The hold-to-run function makes program testing safer.
Fire safety
Both the manipulator and control system comply with ULĺs (Underwriters Laboratory)tough requirements for fire safety.
Safety lamp
As an option, the robot can be equipped with a safety lamp mounted on the manipulator.
This is activated when the motors are in the MOTORS ON state.
Operation
All operations and programming can be carried out using the portable teach pendant
and the operatorĺs panel.
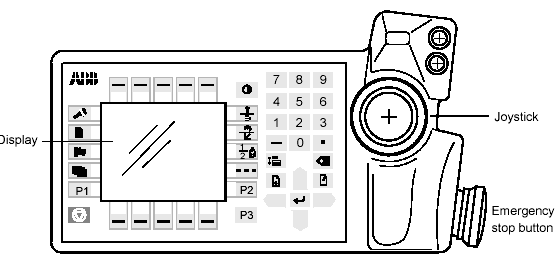
The teach pendant is equipped with a large display, which displays prompts,information, error messages and other information in plain English.
Information is presented on a display using windows, pull-down menus, dialogs and function keys. No previous programming or computer experience is required to learn how to operate the robot. All operation can be carried out from the teach pendant,which means that a specific keyboard is not required. All information, including the complete programming language, is written in English or, if preferred, some other major language.
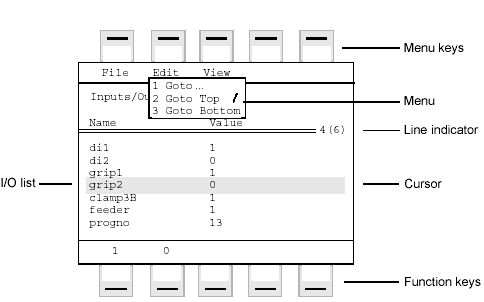
Window for manual operation of input and output signals.
Using the joystick, the robot can be manually jogged (moved). The user determines the
speed of this movement; large deflections of the joystick will move the robot quickly,
smaller deflections will move it more slowly.
The robot supports different user levels, with dedicated windows for:
- Production
- Programming
- System setup
- Service and installation
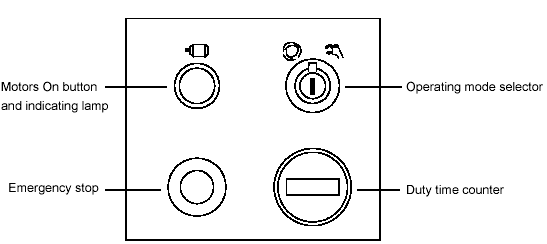
The operating mode is selected using the operatorĺs panel on the controller.
Using a key switch, the robot can be locked in two or three different operating modes depending on chosen mode selector:
Both the operatorĺs panel and the teach pendant can be mounted externally, i.e. outside the cabinet. The robot can then be controlled from there. The robot can be remotely controlled from a computer, PLC or from a customerĺs panel, using serial communication or digital system signals.
Movements
A sequence of movements is programmed as a number of partial movements between the positions to which you want the robot to move. The end position of a movement is selected either by manually jogging the robot to the desired position with the joystick, or by referring to a previously defined position.The exact position can be defined as:
- a stop point, i.e. the robot reaches the programmed position
or
- a fly-by point, i.e. the robot passes close to the programmed position. The size of the deviation is defined independently for the TCP, the tool orientation and the external axes.
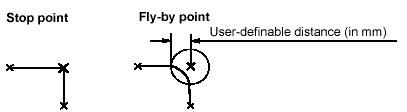
The fly-by point reduces the cycle time since the robot does not have to stop at the programmed point.The path is speed independent.
The velocity may be specified in the following units:
- mm/s
- seconds (time it takes to reach the next programmed position)
- degrees/s (for reorientation of the tool or for a rotation of an external axis)
Program management
For convenience, the programs can be named and stored in different directories.Areas of the robotĺs program memory can also be used for program storage. This gives a very fast memory where you can store programs. These can then be automatically downloaded using an instruction in the program. The complete program or parts of programs can be transferred to/from a diskette.Programs can be printed on a printer connected to the robot, or transferred to a PC where they can be edited or printed.
Editing programs
Programs can be edited using standard editing commands, i.e. "cut-and-paste", copy,delete, find and change, undo etc. Individual arguments in an instruction can also be edited using these commands.No reprogramming is necessary when processing left-hand and right-hand parts, since the program can be mirrored in any plane.
A robot position can easily be changed either by:
- jogging the robot with the joystick to a new position and then pressing the "ModPos" key (this registers the new position)
or by
- entering or modifying numeric values.
To prevent unauthorised personnel making program changes, passwords can be used.
Testing programs
Several helpful functions can be used when testing programs. For example, it is possible to:
- start from any instruction
- execute an incomplete program
- run one cycle
- execute forward/backward step-by-step
- simulate wait conditions
- temporarily reduce the speed
- change a position
- tune (displace) a position during program execution.
Automatic Operation
A dedicated production window with commands and information required by the operator is automatically displayed during automatic operation. The operation procedure can be customised to suit the robot installation by means of user-defined operating dialogs.
The operator dialogs can be easily customised.
A special input can be set to order the robot to go to a service position. After service, the robot is ordered to return to the programmed path and continue program execution.You can also create special routines that will be automatically executed when the power is switched on, at program start and on other occasions. This allows you to customise each installation and to make sure that the robot is started up in a controlled way. The robot is equipped with absolute measurement, making it possible to operate the robot directly from when the power is switched on. For your convenience, the robot saves the used path, program data and configuration parameters so that the program can easily be restarted from where you left off. Digital outputs are also set automatically to the value before the power failure.
Maintenance and Troubleshooting
The robot requires only a minimum of maintenance during operation. It has been designed to make it as easy to service as possible:
- The controller is enclosed, which means that the electronic circuitry is protected when operating in a normal workshop environment.
- Maintenance-free AC motors are used.
- Oil is used for the main gear boxes.
- The cabling is routed for longevity, and in the unlikely event of a failure, its modular design makes it easy to change.
- It has a program memory "battery low" alarm.
The robot has several functions to provide efficient diagnostics and error reports:
- It performs a self test when power on is set.
- Errors are indicated by a message displayed in plain language.The message includes the reason for the fault and suggests recovery action.
- A board error is indicated by an LED on the faulty unit.
- Faults and major events are logged and time-stamped. This makes it possible to detect error chains and provides the background for any downtime. The log can be read on the display of the teach pendant, stored in a file and also printed on a printer.
- There are commands and service programs in RAPID to test units and functions.
Most errors detected by the user program can also be reported to and handled by the standard error system. Error messages and recovery procedures are displayed in plain language.
Robot Motion
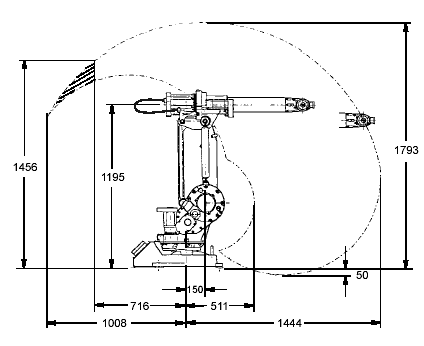
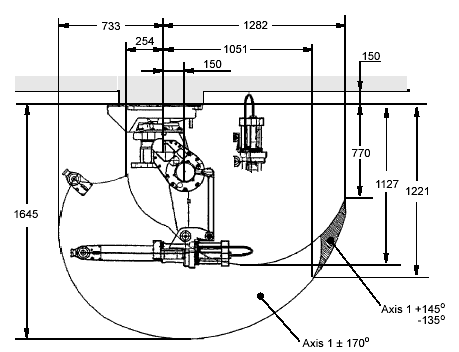
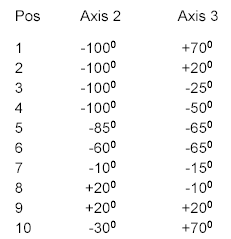
Working space of IRB 1400 (dimensions in mm).
Motion performance
The QuickMove
TM concept means that a self-optimizing motion control is used. The robot automatically optimizes the servo parameters to achieve the best possible performance throughout the cycle - based on load properties, location in working area, velocity and direction of movement.- No parameters have to be adjusted to achieve correct path, orientation and velocity.
- Maximum acceleration is always obtained (acceleration can be reduced, e.g. when handling fragile parts).
- The number of adjustments that have to be made to achieve the shortest possible cycle time are minimized.
The TrueMove
TM concept means that the programmed path is followed ľ regardless of the speed or operating mode ľ even after an emergency stop, a safeguarded stop, a process stop, a program stop or a power failure.The robot can, in a controlled way, pass through singular points, i.e. points where two axes coincide.
The coordinate systems, used to make jogging and off-line programming easier.
The world coordinate system
defines a reference to the floor, which is the starting point for the other coordinate systems. Using this coordinate system, it is possible to relate the robot position to a fixed point in the workshop. The world coordinate system is also very useful when two robots work together or when using a robot carrier. The base coordinate system is attached to the base mounting surface of the robot. The tool coordinate system specifies the toolĺs centre point and orientation.The user coordinate system
specifies the position of a fixture or workpiecemanipulator.
The object coordinate system
specifies how a workpiece is positioned in a fixture orworkpiece manipulator.
The coordinate systems can be programmed by specifying numeric values or jogging
the robot through a number of positions (the tool does not have to be removed).
Each position is specified in object coordinates with respect to the toolĺs position and
orientation. This means that even if a tool is changed because it is damaged, the old
program can still be used, unchanged, by making a new definition of the tool.
If a fixture or workpiece is moved, only the user or object coordinate system has to be
redefined.
Stationary TCP
When the robot is holding a work object and working on a stationary tool, it is possible
to define a TCP for that tool. When that tool is active, the programmed path and speed
are related to the work object.
Program execution
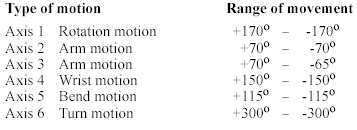
The robot can move in any of the following ways:
- Joint motion (all axes move individually and reach
the programmed position at the same time)
- Linear motion (the TCP moves in a linear path)
- Circle motion (the TCP moves in a circular path)
Soft servo - allowing external forces to cause deviation from programmed position -
can be used as an alternative to mechanical compliance in grippers, where imperfection in processed objects can occur.If the location of a workpiece varies from time to time, the robot can find its position by means of a digital sensor. The robot program can then be modified in order to adjust the motion to the location of the part.
Jogging
The robot can be manually operated in any one of the following ways:
- Axis-by-axis, i.e. one axis at a time
- Linearly, i.e. the TCP moves in a linear path (relative to one of the coordinate systems mentioned above)
- Reoriented around the TCP
It is possible to select the step size for incremental jogging. Incremental jogging can be used to position the robot with high precision, since the robot moves a short distance each time the joystick is moved.During manual operation, the current position of the robot and the external axes can be displayed on the teach pendant.
External Axes
The robot can control up to six external axes. These axes are programmed and moved using the teach pendant in the same way as the robotĺs axes. The external axes can be grouped into mechanical units to facilitate, for example,
the handling of robot carriers, workpiece manipulators, etc. The robot motion can be simultaneously coordinated with a one-axis linear robot carrier and a rotational external axis.A mechanical unit can be activated or deactivated to make it safe when, for example, manually changing a workpiece located on the unit. In order to reduce investment
costs, any axes that do not have to be active at the same time can use the same drive unit.Programs can be reused in other mechanical units of the same type.
Inputs and Outputs
A distributed I/O system is used, which makes it possible to mount the I/O units either inside the cabinet or outside the cabinet with a cable connecting the I/O unit to the cabinet.
A number of different input and output units can be installed:
- Digital inputs and outputs
- Analog inputs and outputs
- Remote I/O for Allen-Bradley PLC
- InterBus-S Slave
- Profibus DP Slave
The inputs and outputs can be configured to suit your installation:
- Each signal and board can be given a name, e.g. gripper, feeder
- I/O mapping (i.e. a physical connection for each signal)
- Polarity (active high or low)
- Cross connections
- Up to 16 digital signals can be grouped together and used as if they were a single signal when, for example, entering a bar code
Signals can be assigned to special system functions, such as program start, so as to be able to control the robot from an external panel or PLC.The robot can work as a PLC by monitoring and controlling I/O signals:
- I/O instructions can be executed concurrent to the robot motion.
- Inputs can be connected to trap routines. (When such an input is set, the trap routine starts executing. Following this, normal program execution resumes. In most cases, this will not have any visible effect on the robot motion, i.e. if a limited number of instructions are executed in the trap routine.)
- Background programs (for monitoring signals, for example) can be run in parallel with the actual robot program. Requires option Multitasking, see Product Specification RobotWare.
Manual functions are available to:
- List all the signal values
- Create your own list of your most important signals
- Manually change the status of an output signal
- Print signal information on a printer
Signal connections consist of either connectors or screw terminals, which are located in the controller. I/O signals can also be routed to connectors on the upper arm of the robot.
Serial Communication
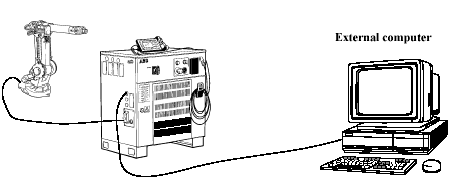
The robot can communicate with computers or other equipment via RS232/RS422 serial channels or via Ethernet. However this requires optional software.
Operation
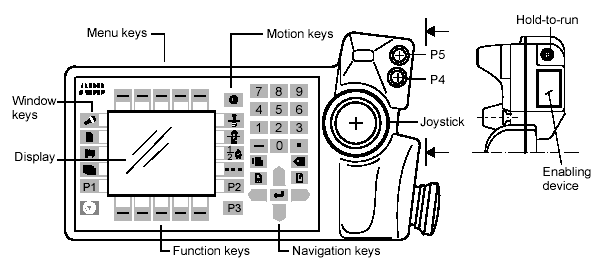
The teach pendant is very easy to use since any functions provided via the function and menu keys are described in plain language. The remaining keys can perform only one function each.
Display
16 text lines with 40 characters per line.
Motion keys
Select the type of movement for robot or external axis when jogging: linear movement, reorientation or axis-by-axis movement.
Navigation keys
Move the cursor and enter data.
Menu keys
Display pull-down menus.
Function keys
Select the commands used most often.
Window keys
Display one of the robotĺs various windows. These windows control a number of different functions:
- Jogging (manual operation)
- Programming, editing and testing a program
- Manual input/output management
- File management
- System configuration
- Service and troubleshooting
- Automatic operation
User-defined keys (P1-P5)
Five user-defined keys that can be configured to set or reset an output (e.g. open/close gripper) or to activate a system input .
Robot Motion
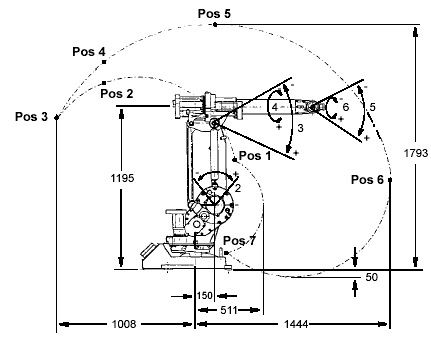
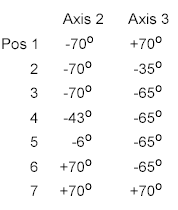
The extreme positions of the robot arm.
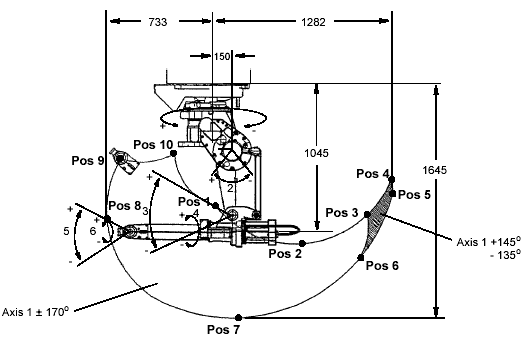
The extreme positions of the robot arm, inverted version (dimensions in mm).
Serial channels, SLIP, outline diagram.